pages

Wednesday, November 30, 2011

Hats for the Polar Express

I've been asked again to make a hat as a raffle prize for the 2nd Annual "The Polar Express" event this weekend.  I thought that the perfect hat would be of course, a polar bear:

Since the event is sponsored by the St. Patrick's Day Committee, I thought it would be nice to make this one as well:

Hope that the event goers like them as much as I had making them!
If you don't buy handmade, at least try to win handmade!

XOXO
Christine

Friday, November 25, 2011

How was Thanksgiving?

Hope that everyone had a wonderful Thanksgiving Holiday and survived the long lines of Black Friday.  Tomorrow is "Small Business" day so please go support the local shops in your community!  

Monday, November 21, 2011

Air Plants

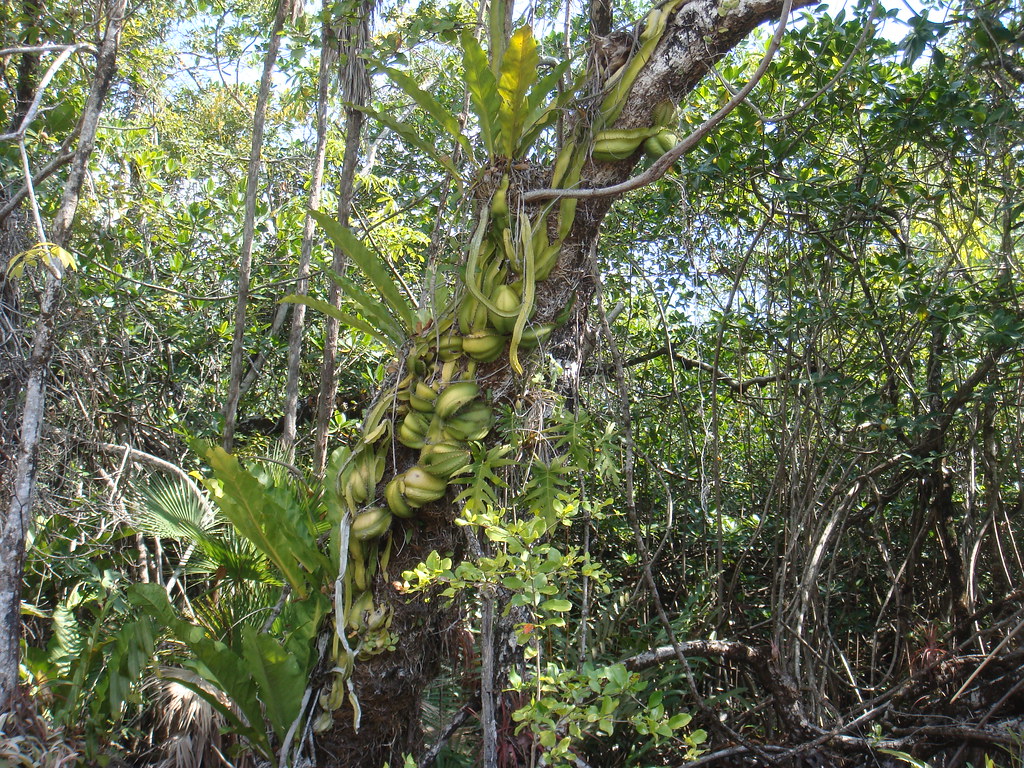
When my husband and I went away for our vacation last month, one of the ports of call during our cruise was Belize.  We decided to go on a tour to Altun Ha, the Mayan ruins.  It was about a forty five minute drive.  We passed Belize City and then had to go through the outskirts of Belize to get to Altun Ha.  On the way, our tour guide pointed out several plants indigenous to Belize.  One particular plant that was interesting was the snake cactus that grew on trees.  I wasn't able to take a picture when we were in the car, but this is what it looked like:

Snake cactus
Source: Flickr

These cacti are also air plants that do not rely on soil to get nutrients, but can survive on air, water, and sun.  I was so intrigued that when we got back from our vacation, I was determined to get some air plants.

There are so many places online where one can order air plants.  However, I wanted to get some from a reliable distributor.  My friend Haley from The Zen of Making was able to direct me toward the right place online which was Air Plant Supply Co.  I definitely knew that Haley knows what she's talking about because she's a pro with air plants AND she even has an air plant chandelier tutorial herself!


After a few days my package finally arrived!

The four little air plants were wrapped so carefully and labeled inside the box.
The package also came with instructions on how to care for the air plants.


These are the plants getting ready for their water bath.  I had to make sure that they were in water for about twenty minutes before I can display them.

Here are three of the smaller air plants in small votive candle holders.

I decided to put the largest air plant in a different container by itself. I searched high and low until I found the right one.  I decided to pick this one up at Ikea for a few bucks and thought it would be perfect because it clearly displays my plant and it still has holes where the air can circulate. Right now it hangs at the corner of my dining room.

These plants are just perfect for someone like me, who's constantly busy.  But even though these little plants are low maintenance, they still make a room beautiful!

Have a wonderful day!
XOXO
C


Sunday, November 20, 2011

The Handmade Tree

Since it's autumn and almost Thanksgiving, I was inspired to make my own handmade tree with re-purposed tree branches that have fallen on the ground from the wind and the past storm.  I thought it would be handy for displaying all sorts of great decorations that will make my home a handmade festive extravaganza! 

Materials:
several twigs or as many as you want
plaster of paris
cup or your chosen container
water
something to stir the plaster (I used a fork)
wire & wire cutter if you have more than one twig
pencil or crochet hook
2 paper clips
scissor


Gather your materials in one area because it is just easier.  
Make sure to cover your work area with newspaper for spills and splatters.

You might be asking why you'd need a pencil or crochet hook.  Well, it doesn't necessarily have to be
exactly a pencil or crochet hook.  It's just what I had in the house that worked.  The crochet
hook/pencil will help your tree stand up straight in your hardening plaster.  You can also use a
chopstick, another twig/branch, or if you want to hold it up yourself for a few hours.
  
If you have more than one twig/branch I would recommend using thing wire to wrap the branches
and to keep them still as the plaster is hardening.  Of course if you have wire, then you would
need some wire cutters.

Gather the branches/twigs that you want to use for the tree.  You may want to move it
around so that you get the shape that you want.

I wanted to make sure that there were enough branches on all sides, but that's my preference. 
You may want your tree to look different.  Keep in mind that if you will be using your tree to
hang decorations, you may want your tree to be almost symmetrical so that the weight of
the decorations are distributed evenly once they're up.

Once you have the shape of your tree, use the wires to keep the branches together at
the bottom.  Now that you have your "tree" ready, put it on the side for now.

Put the plaster of paris powder in your container.  The plaster of paris/water ratio is two to one,
so here I used 1 and 1/2 cups of plaster of paris. Make sure that your container is appropriate for your twigs or branches.  The more or longer your branches are the bigger the container should be,
and that there should be more plaster of paris/water used so that it is proportional. 
Or else your tree can fall easily.

Add the water slowly.  Here I used 3/4 cup of water.

I used the end of the fork to stir the water/plaster of paris mixture.

The mixture should somehow look like pancake batter.  If it is too thin and watery,
just add a little more plaster of paris in the mixture.  If it is too thick, add some water.

Put your tree in the middle of your container in the plaster.

Put the clips on two sides of the cup.  Use your "holder" and place it between the two
clips and the tree.  You can certainly use a pencil or chopstick instead.  Whatever works.

The toughest time is waiting.  Depending on the size of your container,
it may take several days until the plaster sets.  I waited a whole week until I took my tree out of the cup.

Once it's time to take the plaster out, cut the cup with scissors and make slits going down toward the plaster.  Make the cuts about an inch apart going around the cup.  Then, gently pull down the slits and peel the cup off from the plaster.

Trim off the excess plaster on the edge to have an even base. 
This can be easily done by cutting the edges with a scissor.  Easy peasy!
Et voila! So many possibilities!

Hope you enjoyed this tutorial
Go make something!
XOXO
C

Saturday, November 12, 2011

Show Your Pride

There's a big boxing fight on tonight.  I'm not usually a regular viewer of the sport.  I only watch it when Manny Pacquiao goes on the ring.  In the spirit of tonight's big match against Juan Marquez III I've made a special earflap hat.

Let's get ready to rumble!
C

Thursday, November 10, 2011

Thursday Inspiration: Handmade is so much better

Did you start making homemade gifts for your friends and loved ones?  Still stumped?  You don't need expensive craft tools and supplies to make something special, nor do you need to master sewing, knitting, or crocheting.  All you need are your hands and maybe some other things that you may already have handy at home.  There are so many.... numerous....no.. millions of things you can find at a craft store that are already pre-cut, pre-made...and all you need is glue...you do have some glue, right?  Well, I kept this Thursday Inspiration a continuation from the last because I know you can make something for someone this holiday season.  If you've already started your holiday crafting please feel free to post and share what you're making.  Don't worry I won't tell.  If you have any questions about "how to" make something, go ahead and ask because I may be able to answer, and if not, I may know someone who knows someone...who does.  In the meantime, here are some cute and great ideas that I think some of you might like to try.  Hope that they spark some creativity!

Happy crafting!
XOXO
C

Everyone loves yummy goodies, especially cute ones that are packaged so nicely:
 
Marshmallow Snowmen
Source: flickr.com via Lilian on Pinterest


S'mores Kit
Source: shop-fancythat.com via Lauren on Pinterest

Hot Chocolate Packages
Source: flickr.com via Rosemary on Pinterest

Handmade packaging adds so much more to a gift, don't you think?

Handmade Envelopes
Source: sweettidings.blogspot.com via Katharina on Pinterest

These are just really too cool to pass up.

Twig Candle Holder


Rope Bracelet


Painted Bottles


Satin Cord Bracelet

Thursday, November 3, 2011

Thursday Inspiration: Handmade Gift Giving for the Holidays

It's the season of giving.  Can't believe it's already that time of the year.  Around this time I usually like to make handmade gifts for my family and close friends just to make their presents a little extra special.  Giving someone a handmade product does take time, but it just means so much more because of it.  Will you be making handmade goodies for the holidays this year?  I can't even tell you how long my list is, but hopefully the recipients will like what they get. 

There are so many tutorials out there if you're willing to take the time to make something for someone, so you should start now!  I actually wished that I started "making" in July!
Here's a list of some of the great sites online with with great gift ideas:
 
                                                Source: easymakesmehappy.blogspot.com via Heidi on Pinterest