pages

Saturday, December 31, 2011

On to the Next....Year 2012

It's been a while since my last post.  As the weeks and days got closer to the holidays, the "to do" list got longer and longer.  There has been less time for me to work on this blog.  However, finally today I have a little time to post about the past few days.  
Our dog posing in front of the tree with all of the presents.  Needless to say I think a bigger tree is needed.

Christmas at the in-laws involved presents and homemade Korean food.
T: Bimbimbap with bulgogi and spicy sauce
B: Kimchi pancake

Christmas with my family includes two big yummy meals in one day.  Brunch at my mom's where I made the B: ham and egg hash brown pie and a T: traditional Filipino Christmas dinner at my aunt's house.  Both meals were followed by opening of presents.  When my sister, cousins, and I were younger Christmas usually was an all day event, sometimes two.  However, as we got older some of us have moved away out of state, or out of the country but we still try to continue our traditions year after year.

One of my family's Christmas traditions is the passing of the Chia.  Long story, but this is the third Chia we've had ever since we started.  This year I got it!

Dela Chicky and Ella Elephant and I hope that everyone had a Merry Christmas and a Fabulous New Year!  Spend time with family and friends who truly care about you, and make sure you do - you!  

XOXO
Christine

Monday, December 12, 2011

I've Always Wanted One!

This is an update to a previous post from the beginning of the month where I talked about what I made for  the Handmade Gift Exchange on Craftaholics Anonymous.  Last Friday I received my gift from my very talented exchange partner, Jane.  It was a nice surprise to come home to a package after a crazy few weeks because of the upcoming holiday.


Yes, that's right.  It's a handmade crocheted wrist warmer/fingerless gloves.  I've always wanted one!  Jane took extra care with selecting the colors for me.  I love the flower detail too!  She even waited to open the package I sent to her until I got mine.  She's too sweet!  Thanks again Jane for my wonderful present! I love it so much! And a shout out goes to Linda from Craftaholics Anonymous for hosting a great gift swap.  Making something handmade is great.  Receiving a handmade present is wonderful!

XOXO
Christine

Monday, December 5, 2011

Some Birds and Arugula Pizza

Since I stayed in all of last weekend because I was sick, I missed out on all the sales and the hulabaloo of the weekend after Thanksgiving. I definitely had to venture out this weekend at least for some Christmas shopping, food, and some inspiration.  There were a few things that caught my eye and I had to take a pictures of them, because a mental picture at this time of the year definitely will not work!  


1. Started the weekend off with arugula pizza. Yum!
2. Received my package of felt supplies from Giant Dwarf.  Check out the button she added.  Cute!
3.  My Crochet Mama and baby owl were sold, and I had to pack them up.  I don't know if you can tell, but they were kind of my favorite since it's my avatar.  Bye bye cuties!
4.  A weekend isn't complete without going to Target.
5.  I have a thing for birds and birdhouses.  I thought that this little ornament was adorable.
6. Went back to Ikea to get a few things that I didn't purchase from the last Ikea trip.
7. Solar powered owl that moves its head side to side at Pier 1 Imports.  I succeeded in not purchasing it for myself.  The next time I go back, I can't promise anything.
8.  My week isn't complete without take-out from my favorite Thai restaurant.  The wait staff was wondering what happened to me because I haven't been there for a while.

Hope you had a wonderful weekend!
XOXO 
Christine

Thursday, December 1, 2011

Handmade Gift Exchange

Recently I signed up for the Craftaholics Anonymous Handmade Gift Exchange.  I did the last one earlier in the year and had a great time with it, so I definitely had to do it again.  Linda from Craftaholics Anonymous does a wonderful job organizing the whole thing!  Everything is explained so clearly and she sends several email updates and reminders so that participants are kept in the loop and always reminded with sending their presents in a timely manner.  One of the perks is meeting someone else who loves to do lots of crafty things just as much as me!  My partner Jane and I had very similar interests and skills such as crocheting, knitting, and jewelry making.  


If you know me and my etsy shop well, my usual work are hats, owls, and jewelry.  I wanted to step out of the box and make something totally different from what I usually make.  Also, I wanted to make sure that I made something that my handmade gift exchange partner hasn't already made for herself.  However, we both discussed that it's not often that we make things to keep because usually we make them for others.  This is the end result, and I am quite proud of it.  Let me know what you think!  If you want to see what other participants made, check out the Handmade Gift Exchange Winter 2011 Linky Party.  After seeing them you might end up signing up for the next one!

XOXO
Christine

Wednesday, November 30, 2011

Hats for the Polar Express

I've been asked again to make a hat as a raffle prize for the 2nd Annual "The Polar Express" event this weekend.  I thought that the perfect hat would be of course, a polar bear:

Since the event is sponsored by the St. Patrick's Day Committee, I thought it would be nice to make this one as well:

Hope that the event goers like them as much as I had making them!
If you don't buy handmade, at least try to win handmade!

XOXO
Christine

Friday, November 25, 2011

How was Thanksgiving?

Hope that everyone had a wonderful Thanksgiving Holiday and survived the long lines of Black Friday.  Tomorrow is "Small Business" day so please go support the local shops in your community!  

Monday, November 21, 2011

Air Plants

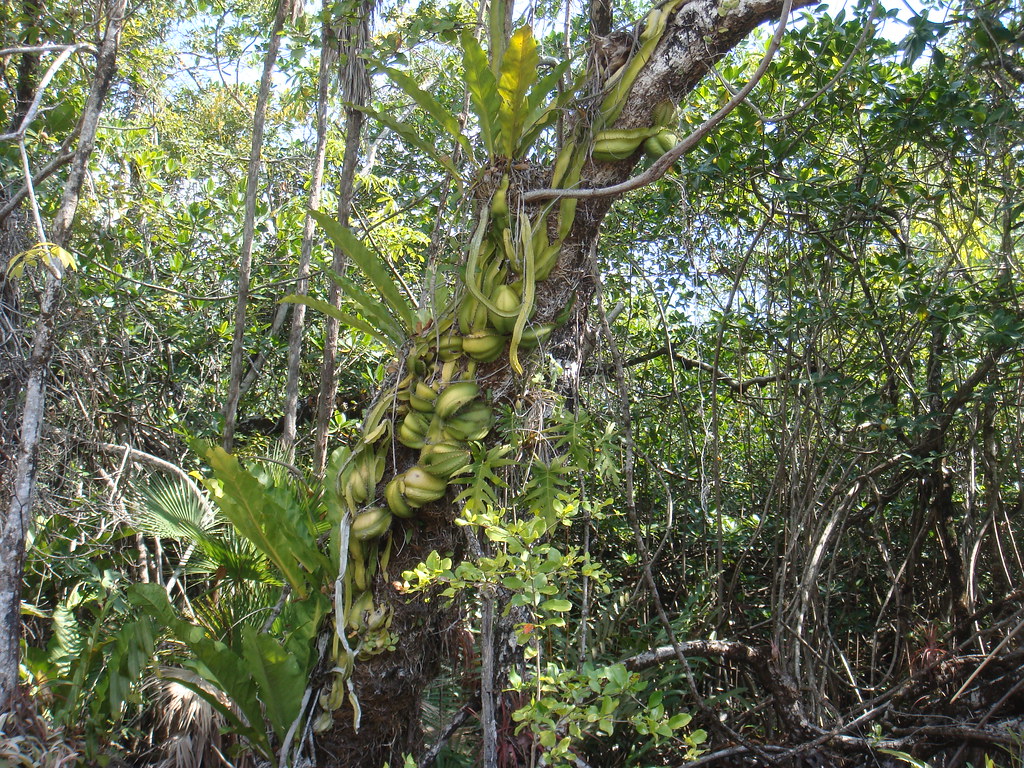
When my husband and I went away for our vacation last month, one of the ports of call during our cruise was Belize.  We decided to go on a tour to Altun Ha, the Mayan ruins.  It was about a forty five minute drive.  We passed Belize City and then had to go through the outskirts of Belize to get to Altun Ha.  On the way, our tour guide pointed out several plants indigenous to Belize.  One particular plant that was interesting was the snake cactus that grew on trees.  I wasn't able to take a picture when we were in the car, but this is what it looked like:

Snake cactus
Source: Flickr

These cacti are also air plants that do not rely on soil to get nutrients, but can survive on air, water, and sun.  I was so intrigued that when we got back from our vacation, I was determined to get some air plants.

There are so many places online where one can order air plants.  However, I wanted to get some from a reliable distributor.  My friend Haley from The Zen of Making was able to direct me toward the right place online which was Air Plant Supply Co.  I definitely knew that Haley knows what she's talking about because she's a pro with air plants AND she even has an air plant chandelier tutorial herself!


After a few days my package finally arrived!

The four little air plants were wrapped so carefully and labeled inside the box.
The package also came with instructions on how to care for the air plants.


These are the plants getting ready for their water bath.  I had to make sure that they were in water for about twenty minutes before I can display them.

Here are three of the smaller air plants in small votive candle holders.

I decided to put the largest air plant in a different container by itself. I searched high and low until I found the right one.  I decided to pick this one up at Ikea for a few bucks and thought it would be perfect because it clearly displays my plant and it still has holes where the air can circulate. Right now it hangs at the corner of my dining room.

These plants are just perfect for someone like me, who's constantly busy.  But even though these little plants are low maintenance, they still make a room beautiful!

Have a wonderful day!
XOXO
C


Sunday, November 20, 2011

The Handmade Tree

Since it's autumn and almost Thanksgiving, I was inspired to make my own handmade tree with re-purposed tree branches that have fallen on the ground from the wind and the past storm.  I thought it would be handy for displaying all sorts of great decorations that will make my home a handmade festive extravaganza! 

Materials:
several twigs or as many as you want
plaster of paris
cup or your chosen container
water
something to stir the plaster (I used a fork)
wire & wire cutter if you have more than one twig
pencil or crochet hook
2 paper clips
scissor


Gather your materials in one area because it is just easier.  
Make sure to cover your work area with newspaper for spills and splatters.

You might be asking why you'd need a pencil or crochet hook.  Well, it doesn't necessarily have to be
exactly a pencil or crochet hook.  It's just what I had in the house that worked.  The crochet
hook/pencil will help your tree stand up straight in your hardening plaster.  You can also use a
chopstick, another twig/branch, or if you want to hold it up yourself for a few hours.
  
If you have more than one twig/branch I would recommend using thing wire to wrap the branches
and to keep them still as the plaster is hardening.  Of course if you have wire, then you would
need some wire cutters.

Gather the branches/twigs that you want to use for the tree.  You may want to move it
around so that you get the shape that you want.

I wanted to make sure that there were enough branches on all sides, but that's my preference. 
You may want your tree to look different.  Keep in mind that if you will be using your tree to
hang decorations, you may want your tree to be almost symmetrical so that the weight of
the decorations are distributed evenly once they're up.

Once you have the shape of your tree, use the wires to keep the branches together at
the bottom.  Now that you have your "tree" ready, put it on the side for now.

Put the plaster of paris powder in your container.  The plaster of paris/water ratio is two to one,
so here I used 1 and 1/2 cups of plaster of paris. Make sure that your container is appropriate for your twigs or branches.  The more or longer your branches are the bigger the container should be,
and that there should be more plaster of paris/water used so that it is proportional. 
Or else your tree can fall easily.

Add the water slowly.  Here I used 3/4 cup of water.

I used the end of the fork to stir the water/plaster of paris mixture.

The mixture should somehow look like pancake batter.  If it is too thin and watery,
just add a little more plaster of paris in the mixture.  If it is too thick, add some water.

Put your tree in the middle of your container in the plaster.

Put the clips on two sides of the cup.  Use your "holder" and place it between the two
clips and the tree.  You can certainly use a pencil or chopstick instead.  Whatever works.

The toughest time is waiting.  Depending on the size of your container,
it may take several days until the plaster sets.  I waited a whole week until I took my tree out of the cup.

Once it's time to take the plaster out, cut the cup with scissors and make slits going down toward the plaster.  Make the cuts about an inch apart going around the cup.  Then, gently pull down the slits and peel the cup off from the plaster.

Trim off the excess plaster on the edge to have an even base. 
This can be easily done by cutting the edges with a scissor.  Easy peasy!
Et voila! So many possibilities!

Hope you enjoyed this tutorial
Go make something!
XOXO
C

Saturday, November 12, 2011

Show Your Pride

There's a big boxing fight on tonight.  I'm not usually a regular viewer of the sport.  I only watch it when Manny Pacquiao goes on the ring.  In the spirit of tonight's big match against Juan Marquez III I've made a special earflap hat.

Let's get ready to rumble!
C

Thursday, November 10, 2011

Thursday Inspiration: Handmade is so much better

Did you start making homemade gifts for your friends and loved ones?  Still stumped?  You don't need expensive craft tools and supplies to make something special, nor do you need to master sewing, knitting, or crocheting.  All you need are your hands and maybe some other things that you may already have handy at home.  There are so many.... numerous....no.. millions of things you can find at a craft store that are already pre-cut, pre-made...and all you need is glue...you do have some glue, right?  Well, I kept this Thursday Inspiration a continuation from the last because I know you can make something for someone this holiday season.  If you've already started your holiday crafting please feel free to post and share what you're making.  Don't worry I won't tell.  If you have any questions about "how to" make something, go ahead and ask because I may be able to answer, and if not, I may know someone who knows someone...who does.  In the meantime, here are some cute and great ideas that I think some of you might like to try.  Hope that they spark some creativity!

Happy crafting!
XOXO
C

Everyone loves yummy goodies, especially cute ones that are packaged so nicely:
 
Marshmallow Snowmen
Source: flickr.com via Lilian on Pinterest


S'mores Kit
Source: shop-fancythat.com via Lauren on Pinterest

Hot Chocolate Packages
Source: flickr.com via Rosemary on Pinterest

Handmade packaging adds so much more to a gift, don't you think?

Handmade Envelopes
Source: sweettidings.blogspot.com via Katharina on Pinterest

These are just really too cool to pass up.

Twig Candle Holder


Rope Bracelet


Painted Bottles


Satin Cord Bracelet